

Hey friends, gather around the kitchen counter because I’m spilling the beans on my favorite Easter treat: an Easy Bunny Butt Cookies Recipe that’s as cute as it is delicious. I’ve been whipping up these adorable cookies for years, and they never fail to get giggles at our springtime hangouts. They’re simple, kid-friendly, and perfect for adding a playful vibe to your Easter table. Let’s dive into how I make these fluffy-tailed delights!
Why I Love These Bunny Butt Cookies
These cookies are my Easter MVP. They’re quick to make, super cute, and versatile enough to tweak with whatever I’ve got in the pantry. The kids go wild for the bunny butt design, and honestly, so do the adults. Plus, I can use store-bought shortcuts or go full homemade depending on my mood.
Every Easter, I set up a decorating station with my friends’ kids, and we have a blast piping on those fluffy tails. The recipe is forgiving, so even if you’re not a pro baker, you’ll nail it. Trust me, these cookies are a crowd-pleaser at brunches, bake sales, or just a cozy night in.
I’ve tweaked this recipe over time to balance ease and flavor. You can make it as fancy or simple as you want. It’s all about those little bunny butts stealing the show!
Easy Bunny Butt Cookies Recipe
Ingredients You’ll Need
Here’s what I grab to make about 24 of these cuties. Each ingredient is easy to prep, and I’ve got tips to make it foolproof.
- Sugar Cookie Dough (1 batch or 16 oz store-bought): I either whip up my no-chill homemade dough or grab a roll from the store. If using store-bought, slice it into ½-inch rounds for even baking. Homemade dough should be rolled to ¼-inch thickness for that perfect soft texture.
- Unsalted Butter (½ cup for homemade dough, softened): Softened butter creams beautifully with sugar for a tender cookie. Let it sit at room temp for 30 minutes before mixing. If I’m out, I’ve swapped in vegan butter for a dairy-free twist.
- Granulated Sugar (¾ cup for homemade dough): This sweetens the dough just right without overpowering. I measure it precisely to keep the cookies from spreading. Brown sugar works for a chewier vibe if you’re feeling experimental.
- Egg (1 large for homemade dough): The egg adds richness and binds the dough. I crack it into a small bowl first to avoid shells. For egg-free, I’ve used 2-3 tablespoons of almond milk with success.
- Vanilla Extract (1 tsp for homemade dough): A splash of vanilla gives that classic cookie flavor. I use pure extract for the best taste. Almond extract is a fun swap if you want a nutty twist.
- All-Purpose Flour (2 cups for homemade dough): This forms the cookie’s structure. I sift it to avoid clumps and ensure a smooth dough. Gluten-free flour blends work if you’re catering to dietary needs.
- Baking Powder (½ tsp for homemade dough): This gives the cookies a slight lift for softness. I measure carefully to avoid puffiness. Baking soda can sub in a pinch, but use ¼ tsp.
- Salt (¼ tsp for homemade dough): A pinch enhances the flavors. I use fine sea salt for even distribution. Skip it if using salted butter.
- White Frosting (1 cup, homemade or store-bought): I make a simple buttercream or use canned vanilla frosting. It needs to be spreadable but firm for decorating. Tint it with food coloring for extra flair.
- Pink Food Coloring (2-3 drops): This adds the cute pink details for bunny feet and tails. I use gel coloring for vibrant hues. A tiny bit goes a long way.
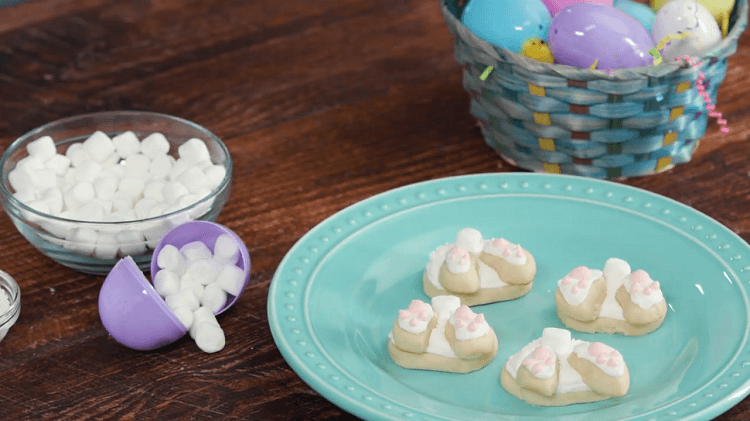
- Mini Marshmallows (24 for tails): These make the fluffiest bunny tails. I pick fresh, soft ones for easy sticking. White chocolate chips can sub if marshmallows are missing.
- Large Marshmallows (24 for feet): Cut these in half for the bunny paws. I use kitchen scissors for clean cuts. Small cookies or fondant circles work as a backup.
- White Sanding Sugar (¼ cup): This adds a sparkly, furry look to the bunny butts. I sprinkle it lightly for texture. Shredded coconut is a great alternative for a fluffier effect.
- Pink Candy Melts (¼ cup): Melted for piping bunny paw details. I melt them in 15-second bursts in the microwave. Pink frosting can substitute if you don’t have melts.

Equipment I Can’t Live Without
I keep it simple with tools you probably already have. A rolling pin, round cookie cutter (about 3 inches), and parchment paper are musts. Piping bags with a small round tip (like Wilton #2) and a star tip (for tails) make decorating a breeze. A baking sheet and cooling rack round out the essentials.
If you don’t have piping bags, Ziploc bags with a snipped corner work fine. I’ve even used a toothpick to dab on small frosting details in a pinch. No need for fancy gear—just a little creativity!
Step-by-Step: Making the Cookies
Let’s get to the fun part: baking and decorating these bunny butt cookies. I’ll walk you through how I do it, step by step. It’s easier than it looks, promise!
Step 1: Prep the Dough
If I’m making dough from scratch, I cream the butter and sugar until fluffy. Then I beat in the egg and vanilla, followed by the dry ingredients. The dough comes together fast—no chilling needed. If using store-bought, I slice it into rounds and skip to baking.
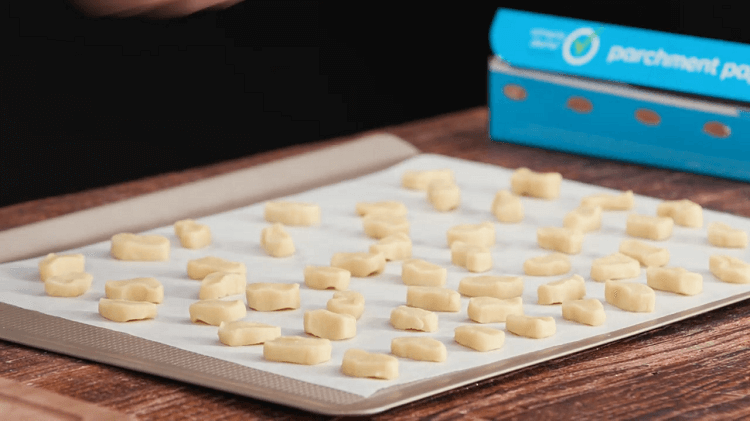
I roll homemade dough to ¼-inch thick on a floured surface. A 3-inch round cookie cutter gives me perfect circles. I get about 24 cookies from one batch.
Step 2: Bake the Cookies
I preheat the oven to 350°F and line a baking sheet with parchment. Cookies go on, spaced 2 inches apart. They bake for 8-10 minutes until the edges are just golden. After cooling for 5 minutes on the tray, I move them to a rack to cool completely.
Pro tip: Don’t overbake. They should be soft, not crispy. If they brown too much, they lose that tender bite.
Step 3: Whip Up the Frosting
For homemade buttercream, I beat ½ cup softened butter with 2 cups powdered sugar and a splash of vanilla. Add a tablespoon of milk for smoothness. If using store-bought frosting, I stir in a few drops of pink food coloring for the bunny details.
I split the frosting: most stays white for the base, and a small portion gets dyed pink. Both go into piping bags for easy decorating. If the frosting’s too thick, I add a tiny bit of milk.
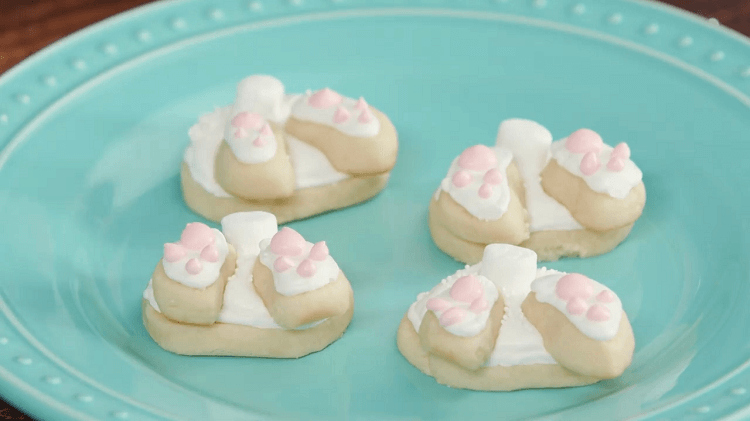
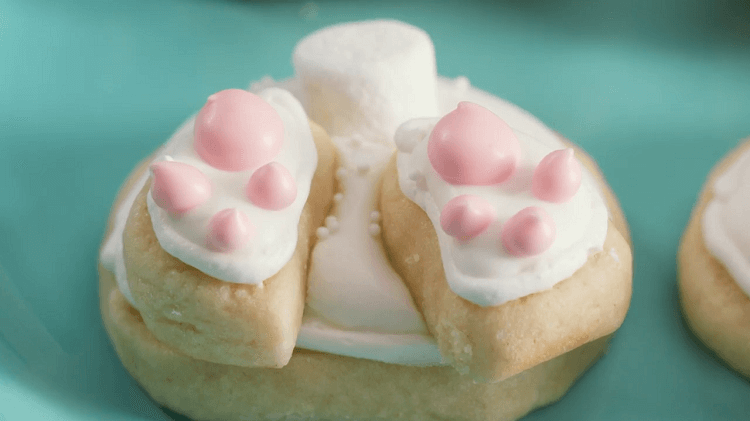
Step 4: Decorate the Bunny Butts
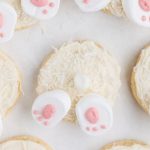
Once the cookies are cool, I spread a layer of white frosting over each one. I dip some in white sanding sugar for that fluffy bunny look. Then, I cut large marshmallows in half and stick two halves on the bottom of each cookie for feet.
Using the pink candy melts or frosting, I pipe small ovals for paw pads and three tiny dots for toes. A mini marshmallow gets plopped in the center for the tail, secured with a dab of frosting. Sometimes I pipe a star-shaped tail with white frosting for extra fluff.
Step 5: Let Them Set
I let the cookies sit for 1-2 hours until the frosting firms up. This keeps the decorations from smudging. If I’m in a rush, I pop them in the fridge for 30 minutes. Then they’re ready to serve or store!
My Tips for Cookie Success
Over the years, I’ve learned a few tricks to make these cookies foolproof. First, don’t skip cooling the cookies completely before frosting—they’ll melt the icing otherwise. If you’re short on time, store-bought dough and frosting cut prep time in half.
Kids love helping with the decorating, so I set out bowls of sprinkles and let them go wild. For a twist, I’ve swapped marshmallows for white chocolate chips or even fondant for a smoother look. If you’re not into coconut or sanding sugar, try white sprinkles for that furry effect.
Storing and Making Ahead
These cookies stay fresh in an airtight container at room temp for up to 3 days. I layer them with parchment to keep the frosting intact. You can also freeze baked, undecorated cookies for up to 2 months—just thaw and decorate when ready.
If I’m prepping for a party, I bake the cookies a day ahead and frost them the morning of. It spreads out the work and keeps them fresh. Trust me, they disappear fast at gatherings!
Why These Cookies Are a Hit
The charm of these cookies is their simplicity and whimsy. They’re not just a dessert—they’re a conversation starter. I love watching guests’ faces light up when they see those cute bunny butts on the dessert table.
They’re also versatile. I’ve made them with chocolate cookie dough for a richer flavor or swapped pink candy melts for jelly beans for extra chew. You can adapt this recipe to whatever you have on hand.
Nutritional Info (Because I Know You’re Curious)
I ran the numbers for one cookie (based on homemade dough and frosting). It’s about 200 calories, with 10g fat, 28g carbs, and 15g sugar. Not health food, but perfect for a holiday treat. If you need precise numbers, plug the ingredients into a nutrition calculator.
These cookies are indulgent, but I balance them with lighter snacks at my Easter spread. A little sweetness goes a long way. Plus, the joy they bring is worth every bite.
Customizing Your Bunny Butts
One thing I love about this recipe is how flexible it is. Want a different flavor? Add almond extract to the dough or use chocolate frosting for a bolder look. If marshmallows aren’t your thing, white chocolate buttons or even meringue drops make great tails.
For a gluten-free version, I’ve used a 1:1 gluten-free flour blend with no issues. Vegan friends? Swap in plant-based butter and a flax egg. The decorating options are endless—sprinkles, candy melts, or even edible glitter for extra sparkle.
Pairing Ideas for Your Easter Spread
These cookies shine on their own, but I love pairing them with other spring treats. A glass of cold milk is a classic combo. For parties, I set them out with carrot cake cupcakes or a fruity punch to keep the vibe festive.
If you’re hosting a brunch, add some savory bites like deviled eggs to balance the sweetness. The cookies also look adorable in cellophane bags for gifting. I’ve even tucked them into Easter baskets for an extra surprise.
My Easter Baking Tradition
Easter is my favorite baking holiday—something about those bright colors and playful themes gets me every time. These bunny butt cookies have become a staple in my kitchen. They’re a nod to the fun, lighthearted side of spring.
I started making them years ago after seeing a similar idea at a friend’s party. Since then, I’ve tweaked the recipe to make it my own. It’s now a tradition to bake these with my family, and we laugh every time we pipe on those tiny bunny toes.
Getting Kids Involved
If you’ve got little helpers, this is the perfect recipe to get them in the kitchen. I give my nieces and nephews butter knives to spread frosting and let them sprinkle on the sanding sugar. They love sticking on the marshmallow tails and giggling over the “bunny butts.”
It’s a great way to make memories without stressing over perfection. The cookies don’t need to be flawless to be adorable. Plus, the kids feel proud showing off their creations.
Troubleshooting Common Issues
Sometimes things don’t go as planned, but I’ve got you covered. If your cookies spread too much, check your oven temp or reduce the butter slightly. Frosting too runny? Add more powdered sugar a tablespoon at a time.
If the marshmallow feet won’t stick, use a bit more frosting as glue. And if your piping skills aren’t pro-level, don’t sweat it—imperfect bunny butts are still super cute. Practice makes progress, and I’ve had my share of wonky tails!
Why I Keep Coming Back to This Recipe
This Easy Bunny Butt Cookies Recipe is my go-to because it’s reliable and fun. It’s not just about the cookies—it’s about the smiles they bring. Whether I’m baking for a party or just a cozy night with friends, they always deliver.
The combo of soft cookies, creamy frosting, and those adorable marshmallow tails is hard to beat. I’ve made them for bake sales, Easter brunches, and even just because. They’re a little piece of joy in every bite.
Frequently Asked Questions
Can I use store-bought cookie dough?
Absolutely! Store-bought sugar cookie dough works great and saves time. Just slice, bake, and decorate as usual. I’ve used it plenty when I’m in a rush.
How do I store these cookies?
Keep them in an airtight container at room temp for up to 3 days. Layer with parchment to protect the frosting. You can also freeze undecorated cookies for 2 months.
Can I make these gluten-free?
Yes! Use a 1:1 gluten-free flour blend for the dough. The rest of the recipe stays the same. I’ve had great results with brands like Bob’s Red Mill.
What if I don’t have marshmallows?
No worries! White chocolate chips, large sprinkles, or even fondant balls make great tails. For feet, try small cookies or cut fondant into ovals.
Can kids help with this recipe?
Definitely! Kids love spreading frosting and adding marshmallows. Give them a butter knife or piping bag for safe decorating fun. It’s a great family activity.
How do I get the frosting to set faster?
Pop the decorated cookies in the fridge for 30 minutes. It helps the frosting firm up quickly. Just don’t stack them until they’re fully set.
Can I use different cookie flavors?
For sure! Chocolate or shortbread dough works well. Just keep the cookies about 3 inches round for the bunny butt design. Experiment and have fun!
What’s a good substitute for pink candy melts?
Pink frosting or jelly beans work great for paw details. You can also melt white chocolate and tint it with oil-based food coloring. A little dab does the trick.
Easy Bunny Butt Cookies Recipe
Ingredients
- 1 package refrigerated sugar cookie dough (or homemade sugar cookie dough
- 1 cup white frosting
- 12 large marshmallows (cut in half)
- 1 cup shredded coconut (optional for a fluffy tail effect)
- Pink sprinkles or sanding sugar
- Pink candy melts or pink icing for paw details
Notes
Cooking Steps
- Preheat Oven: Set to 350°F (175°C) and line a baking sheet with parchment paper.
- Shape Cookies: Roll sugar cookie dough into small balls (about 1-inch each) and slightly flatten them.
- Bake: Place on the baking sheet and bake for 10-12 minutes until edges are lightly golden. Let cool.
- Decorate: Spread white frosting over each cookie.
- Add Marshmallow Tails: Press half a marshmallow onto the center of each cookie. Optionally, roll in shredded coconut.
- Make Bunny Feet: Use pink icing or melted candy to create paw prints on the cookies.
- Let Set & Enjoy: Allow decorations to set before serving.

Hello! I am a seasoned culinary veteran whose passion for cooking began in my family kitchen and later I explored global cuisines. Now as a owner of the "OhMyRecipe" blog, I share my expertise by blending classic techniques with innovative twists. I advocates for culinary education and community engagement, making cooking accessible and enjoyable for all. Join me on a flavor-filled journey of delicious dishes and culinary inspiration.